Arms from Profiles
Program(s): Rhinoceros 3D There are a few ways to make easy arms. This tutorial
will teach you how to loft them from four profile interpolated splines.
Although making a basic arm is easy, making it look detailed and defined
is yet another story for another time and tutorial. Here goes...
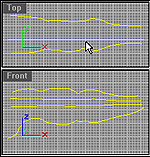
Start up Rhinoceros 3D and pick the interpolated curve tool by using the
"InterpCrv" command. This will enable you to draw the curves as seen i
the figure below. You can see 4 curves in the 2 different viewports in
Figure 1.

Figure 1
4 Profile Arm Splines
Next you must pick loft from the surface menu or use the command "loft". This enables the loft tool. Now you must pick each of the splines in a clockwise rotation (or counterclockwise, it doesnt really matter as long as they are in order). Then press enter to send the command and bring up a dialog box.
*Note* The reason why we use an Interpolated curve is because the polyline has jagged, sharp edges i which we do not need for this model.
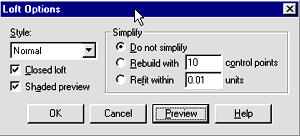
----- Now a dialog box should pop up and have a few different settings. In the Figure below you can view the settings that we have used in making this model. You should later go back and check individually what each setting does.

Figure 2
Loft Options
The terms and buttons of the Loft Dialog Box do the following:
Closed Loft:closes the surface (In this case we do not want to use this.)
Shaded Preview: When quick shade is activated, it shows the current loft in progress in a shaded view.
Do not simplify: Uses the current set of points on a spline to determine where isoparms will be located.
Rebuild with **: Rebuilds a surface using ** number of isoparms(** is a number you indicate).
Style: Determines how your surface will be generated. Normal builds it with normal tightness and so on, while straight sections build a surface with straight sections at each isoparm.
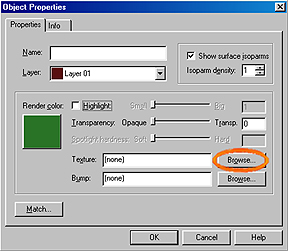
---- Surfacing in Rhinoceros is quite easy and quick since there are very few options available. Use the properties command to access the texture panel as seen in Figure 3.

Figure 3
Object Property's / Texturing