| |
1. Start to experiment with the MATERIAL MODIFIER palette.
Everything you need is in there or can be included from the Texture
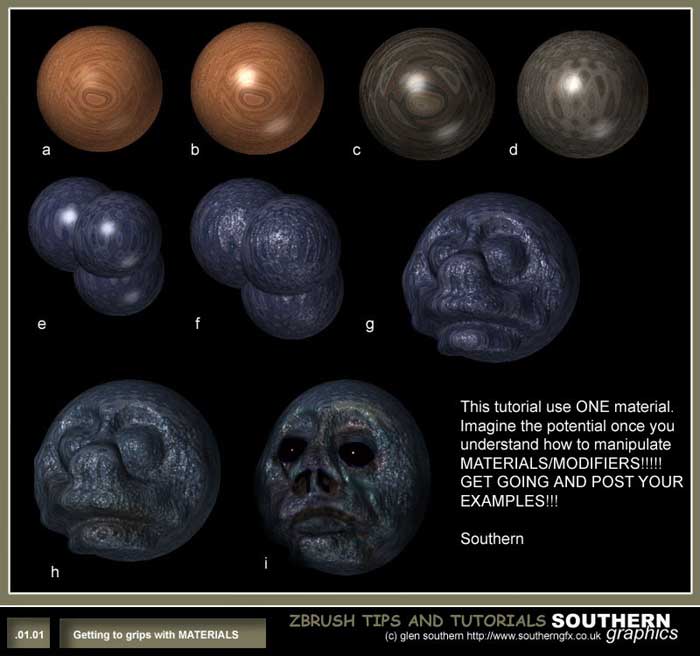
dropdown. For example, take Material Gradientmap2b. Click on this material
from the pop out and it becomes the current, selected material (a)
2. Draw a spere, TOOL/SHPERE. Click on the Material/Mmodifiers
button and you will see three buttons S1, S2 and S3 (S=SHADER). Click S3
and look for `specular`. There is a numerical slider and a graph below.
Slide the numerical slider to 70% and the material becomes more specular
(more highlight on it).(b)
3. Now, click S1, and look down at the
bottom. You will find a little brown image, hold the mouse cursor over it
and you will see it is called the `ABMAP`. This is a TEXTURE and can be
replaced with one from the TEXTURE PALETTE or an imported image. To do
this, go to the texture palette and pick TEXTURE22 (a dirty grey/brown
image). Go back to the MATERIAL/MODIFIERs/S1 and click in the ABMAP area.
The image is replaced with the image from the TEXTURE PALETTE and your
texture has been updated (c)
4. Stay in S1 and adjust the sliders
for X factor, Y Factor, SIne etc. THese change the mapping if differing
ways. Experimentation is the only way my friends. (d) Now, the top button
in S1 is the intensity (make sure that the TEXTURE palette is set to `no
texture`). Go to the COLOUR float or drop down palette. Pick a blue
colour. GO back to MATERIEL/MODIFIERS/S! and reduce the intensity to 80%
with the slider. This allows colour to show through affecting the tint of
your new MATERIAL. Now draw a few spheres. (e) Remember, this is all in
Preview render mode not best render. There is no bump map as yet.
5. Go to MATERIAL/MODIFIERS/S2. Change the BUMP setting to 50%.
Click RENDER/BEST RENDER to see the affect on your spheres.(f)
6.
Build a quick model using a sphere and a lttle bit of TRANSFORM/EDIT
OBJECT. Something basic, I used a head with a pronounced lip. (g) If you
left the texture selected it will automatically texture the head for you.
If not, paint it on with `Z` turned off in the DRAW drop down.
7.
Now go to the ALPHA pallet and click Brush 7. Select the SIMPLE brush (or
single layer) from the TOOL palette. The Z tunrned on in the DRAW palette
start to `dab` the image and start to bring the little bumps `through` the
skin of the image. To change the effect, change the brush colour to a
light blue and change the ALPHA to Brush 4. Keep changing the ALPHA, the
DRAW size, the COLOUR and the Z intensity in the DRAW palette. This will
give you a lot of differing style. (h)
Turn Z off sometimes just to add
colour or darken areas. I added some sphere eyes using the PLASTIC TOY
material and BLACK. |
|
