|
Painting a digital illustration Tutorial
Program(s): Photoshop 6 and a mouse
|
This tutorial is featured in the "Digital
Fantasy Painting" book
|
|
Step 1 - The sketch
For this digital painting, I used Photoshop
6, an optical mouse on a Pentium 300Mhz with 128 MB
of memory, displayed at 1024x768 resolution on a 17"
monitor.
This tutorial explains a method and technique mostly
useful when applied on a slow compuer and when the only
input tool available is a mouse and a keyboard, no graphic
tablet.
This drawing was inspired by a vivid vision
from a nightmare.
The first and most important step for me
is to set the right mood for the illustration. I chose
to use an orange background color because flesh tones
can be easily rendered from it.
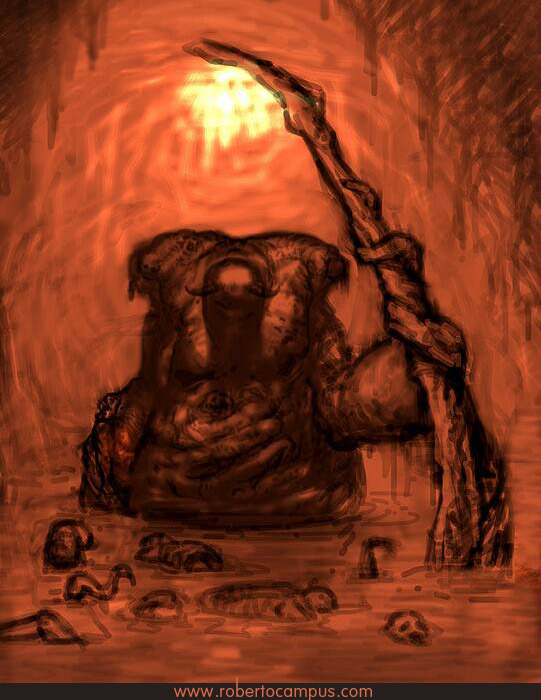
I then sketched the main subject on a separate
layer (set on multiply) that I kept above the plain
colored background.
At this stage, I used the Paintbrush tool set on normal
mode with a 10% - 50% opacity black smooth brush varying
in size from 5 to 80 pixels wide.
To avoid slowing down the computer during
the sketching process I prefer working in low resolution
(72 DPI). This way I can draw enjoying a more natural
flow without having to worry about Photoshop catching
up on my last stroke.
Also, I did not spend any time on
details during this phase: I fully concentrated on roughing
out the shapes, volume and composition.
|
 |
|
|
Step 2 - Turning on the light.
Sketch finished, I resized the image to
a higher resolution (300 DPI). The focus shifted to
refining the lighting in the sketch layer.
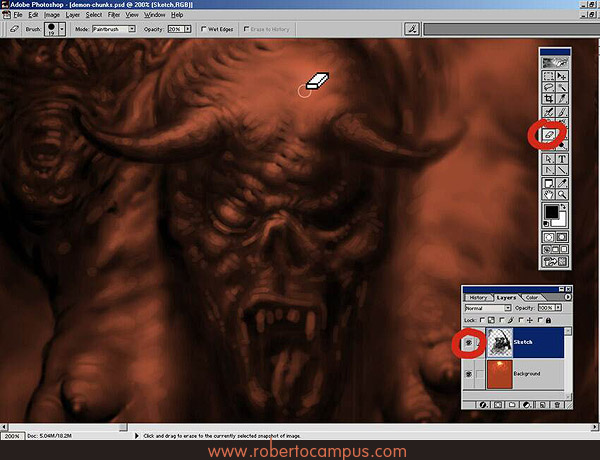
For this stage I employed an opacity "subtraction"
technique. I relied heavily on the eraser tool (10%-30%
opacity medium sized hard-edged brush) to lighten up
areas that were too dark.
While sketching, I had decided that the main light source
would be positioned very high above the subject, almost
perpendicular to it.
The perfect place for a light source when you need it
to cast strong and dramatic shadows.
I zoomed in to 200% and started working
on the demon's head. Where I felt a highlight was needed
I erased pixels to reveal the orange background below.
I imagined the demon skin as being very
rough and wrinkly, with many heavy folds layered on
each other.
I begun defining its base texture by adding
smaller highlights (with a 5 pixel wide hard-edged brush)
where I felt skin creases and folds should go.
Once finished with the highlights,
I was left with a very light amount of pixels on the
figure layer. I planned this, because the next phase
in the drawing was mostly based on smudging.
|
 |
|
|
Step 3 - Details
Here is where all the rough edges disappear
and the highlights blend in.
The smudge tool is the slowest Photoshop
painting tool and I find its performance not to be fast
enough, not even on a powerful PC. This is why I made
sure to arrive to this step with the least amount of
pixels to smudge.
Also, while working on this step I paid
careful attention to every brush stroke so to avoid
having to go back and fix areas of the drawing later
on in the process.
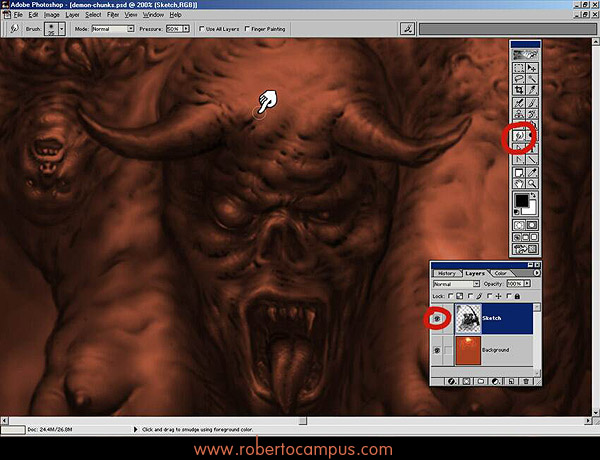
Mostly, I used the smudge tool set to normal
mode, 40% opacity and a brush size from 10 to 30 pixels
wide. The goal was to blend all the highlights I had
put in place before, making sure at the same time to
shape all the skin folds and creases in a very organic
(and twisted!) way.
After having blended the highlights in,
I had to use the paintbrush tool to darken many areas.
I applied short strokes of black pixels where needed
and then I smudged them and shaped them to add detail
to shadows that were lacking in strength. This is a
technique I use when I paint in real media (oil colors
on board) and I love to apply it to the digital medium.
This step was definitely the slowest
part of the whole process (probably 35 hours of work,
2-3 hours a day for a few weeks).
|
 |
|
|
Step 4 - Textures
Once I finished adding details and finer
shadows, I decided that in order to add more realism
to the main figure, I had to apply textures to it.
I started by flattening the main figure
and the background layers into a single one. To create
the texture, I scanned the skin on the palm of my hand
at 600 DPI and saved it in Photoshop format (PSD).
I opened the new file in Photoshop and I
created a seamless pattern (using the clone stamp tool
to blend areas closer to the edges). I tested out the
pattern to see if it would tile without a seam and when
I was happy with the results I saved it as a PSD file.
Next, I went back on editing the demon illustration.
I used the mask tool to create a selection that would
encompass the main figure and then I saved the selection
as an alpha channel (for later use).
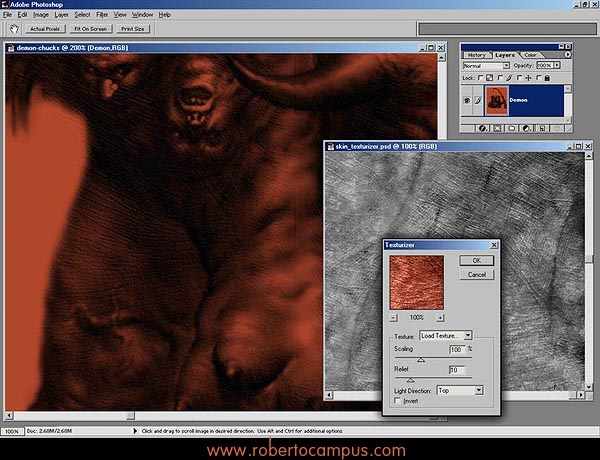
To apply the newly created texture I used
the Texturizing filter. I set its size at 150% with
relief set on 10. After the filter was applied, I used
the recent Photoshop feature that allows to "fade" out
the last effect that was applied. I set the fade out
value at 60% to reduce the strength of the texture on
the main figure.
Now the skin had achieved a realistic
gritty look that reminded me of elephant skin. The image
was ready for the next step.
|
 |
|
|
Step 5 - Final highlights
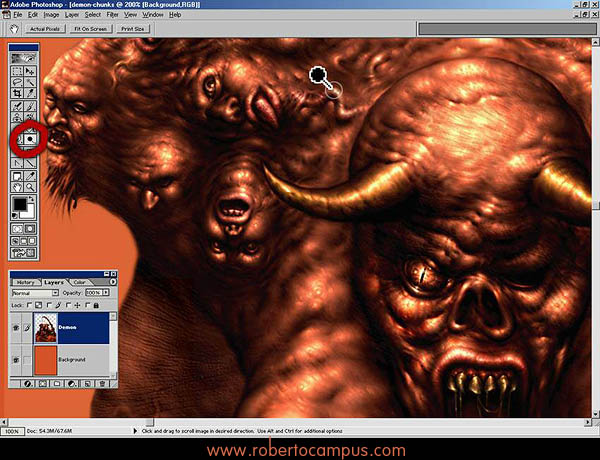
The dodge tool is my favorite tool when
it comes to creating highlights on flesh. It is very
helpful when used correctly.
I set the dodge tool to highlights and starting
from a red-orange base, I easily brought up lighter
oranges and yellow tones. I proceeded to apply the effect
on all the areas that required highlights using a small
brush and an exposure mostly set on 25%.
For lighting up larger areas I used the
paintbrush tool set on "overlay" with a light color
(yellow and white) and opacity of 10%. The overlay blending
mode works really well when you need to add light to
an area while at the same time avoiding drastically
changing its hue (color), like the dodge tool often
does.
During this step, once again, I add to darken
many areas and also I colorized a few details of the
subject such as the horns and teeth to give them a more
yellow appearance.
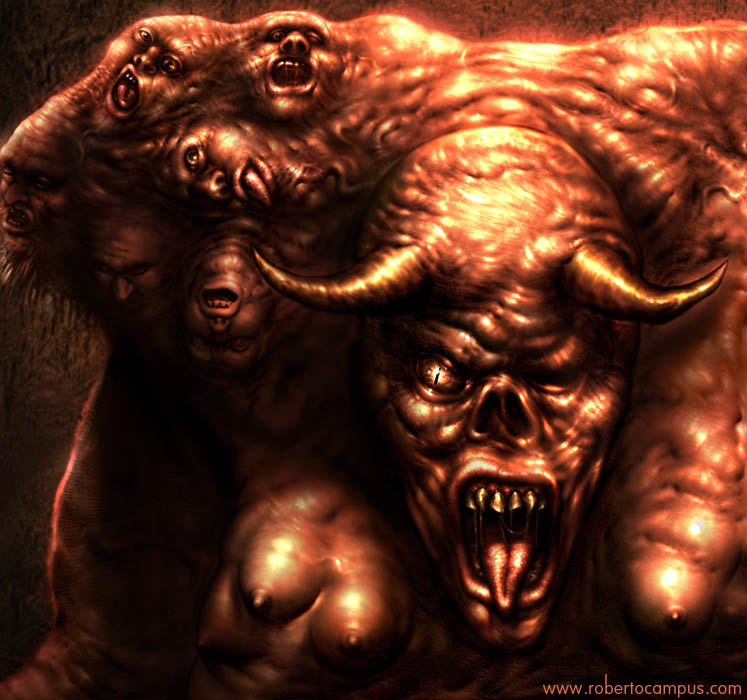
I had fun adding many smaller additional
details: a vast number of veins and skin folds, teeth,
saliva and eyes on the heads embedded on the demon's
shoulder.
|
 |
|
|
Step 6- Background and fine-tuning
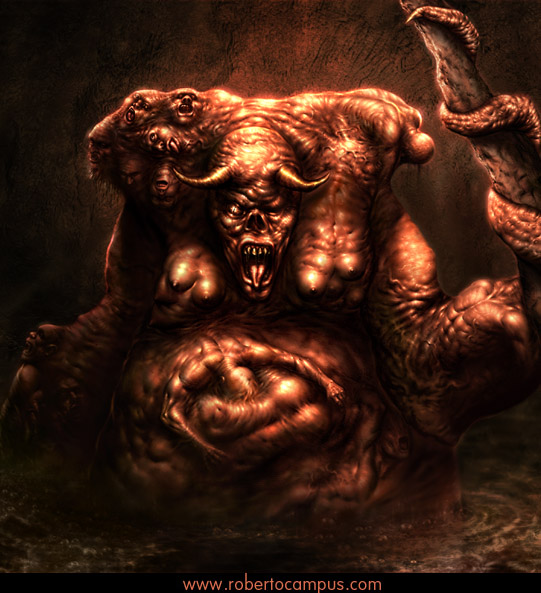
The main subject was ready. All I needed
now was a background and some minor foreground elements,
such as the pool of liquid the demon is partially immersed
in and the long stick/scepter in its tentacle's grasp.
For the background I used 3D Studio Max
to render a cave wall. The process would require a tutorial
all on itself, but for simplicity I will explain the
major step involved in it: I used a few rock textures
I had created before. I blended them together into a
seamless pattern and saved the image. I then imported
it in 3D Studio and I assigned the pattern as a bump
and diffuse material to an object that was illuminated
by a single red light source.
The scepter in the demon's tentacle was
created in 3 steps. First I put the scepter on a separate
layer (below the demon's layer). Then a texture was
applied to it using the texturizer. Finally I used the
dodge tool to bring highlights up. I also drew a chain
and a hanging skull on top of the scepter (this alone,
took me 8 hours).
At this point, in order to blend everything
together I had to have the demon on a separate layer.
I went back to the demon's layer and erased everything
around its edges so to have only the demon remain. Now
I loaded the rendered background image in a new layer
and I moved it below the demon's layer. I cleaned up
a few stray pixels from the layers above the background
and then I flattened the image.
What I was aiming for now was to join all
the elements into a harmonious whole.
I adjusted the image levels and colorized it until I
obtained a more uniform feel and tone.
|
 |
Detail
|
|
|