`THE CORROSIVE MARINE`
a ZBrush Tutorial by Glen
Southern |
|
1. THE PROJECT
BEGINS
For some time prior to creating
the Corrosive Marine image I had been wanting to work on a full body
image in ZBrush. In my first year with ZBrush I tried to specialise
in head studies (mainly because I wanted to become as good as Ofer
Alon who created the RRRRR series of
images)
and I had been happy with the
level of detail I had reached at that
stage. To move forward I wanted to put
together a `scene` that showed a full figure set in a 3D
environment. I chose to use the Warhammer 40,000 universe as a
setting and settled with an old favorite from my youth, the Space
Marine.
I wanted to create an image that would allow me to
stretch my skills with the new Texturemaster ZScipt and I also
wanted to use the tequniqe that Ofer introduce in a thread at ZBC,
namely rust and corrosion. |
| 2. STARTING OFF WITH A
SKETCH |
| To begin a project like this I
usually set up the document first.
|
 Open ZBrush and set
the document size to that required for the project (2000x2400) Open ZBrush and set
the document size to that required for the project (2000x2400)
|
 Add about 4 layers at
this stage as it`s quicker to add them now than when the program is
holding lots of information. Add about 4 layers at
this stage as it`s quicker to add them now than when the program is
holding lots of information. |
 Place a `plane`
in one of the layers. This will be used to paint the background onto
in a flat material later on. However at the start I use this layer
to `sketch` out the image I want to create. Place a `plane`
in one of the layers. This will be used to paint the background onto
in a flat material later on. However at the start I use this layer
to `sketch` out the image I want to create. |
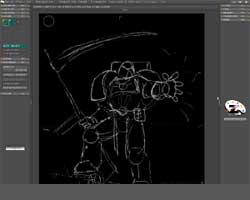
In the past
I have used hand drawn sketches (scanned in and resized) for this
layout job. The main reason I do this is to ensure that I keep
proportion and composition right, and you will know, there is
nothing worse than detailed an area of an image only to find that
it`s in the wrongplace ar too big. (See IMAGE
1) |

IMAGE : Initial Sketch on its own
layer |
| 3. METAL/RUST MATERIALS |
| To create
the materials for this project I used a method described in Pixolators
Golden Idol ZScript. This ZScript shows you how to make
contrasting materials that when combined give a good likeness to
corroded metal. I have made the ZMT (materials available below).
However, please be aware that the corrosive texture (ie. the
colours) were created by mixing up the materials and adding
different shades of brown and orange. |
|
|
|
TOOL MODIFIERS MODIFIERS DEFORMATION DEFORMATION INFLATE INFLATE |
| 4. MODELLING THE PARTS |
 |
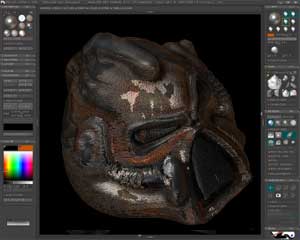
With a project of this size that requires
a large number of ZTools (models/objects) I usually open a
default document of 1000x1000 with a black or grey background
and then model, texture and save them out as .ZTL files before
assembling them in the main document.

 See larger version See larger version 
| |
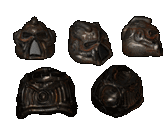
Most of the pieces that I created started out as a sphere,
ring, tube or box. There are a number of good modelling tutorials
around to help you get to grips with the basics. Try my head
modelling tutorial that was produced for EFX magazine.
Most of the ZTool parts were modified using an alpha mask to
inflate or deflate areas of the mesh. Here`s an example:
Use the Ring3D tool for this pipe object and in
the
TOOL MODIFIERS MODIFIERS INITIALIZE INITIALIZE
set the Hdiv
and Vdiv to maximum and the COVERAGE to 90
degrees and the SRAD down to 20
|
|
Import the
alpha that you want to use as a mask:
ALPHA IMPORT IMPORT |
Use the:
TOOL MODIFIERS MODIFIERS SELECTION SELECTION ALP ALP
This will take the alpha and
wrap it around the selected ZTool. In our case the Ring3D. If
it is not in the right position you can use the flip horiz,
flip vert, rot and even the neg buttons in the ALPHA
panel. Your ZTool should now have grayed out areas. The darker
the areas the less effect any deformation will have on that
area. |
Use the:
TOOL DEFORMATIONS DEFORMATIONS INFLATE INFLATE
slider and set it to
about 20 (or whatever you like. The ZTool should now be
inflated only ob the unmasked areas. |
| This is
the basic method of modifying a ZTool using alpha
masks. | |
| 5. PAINTING THE
BACKDROP |
The background is painted onto the plane that I
created at the start of the project.
I used the flat
material and a range of the standard alpha brushes that come
with the program. The process is just like using any standard
2D painting package, you simply paint onto a canvas until you
achieve the desired result.
To get the cloud effect I
used a few different colours and went over the same area time
and time again without having any depth switched on (Z off).
To blur the clouds I used the smudge tool, again with Z off,
and smudged around the whole canvas. Finally I used the
shading-enhancer brush to give some
contrast. |
|
6. PUTTING THE SCENE
TOGETHER
|
|
|
After all the pre work and modelling I was eager to
start compiling the image. Using the sketch in a back layer (turning
it on and off regularly) I started to put the pieces into the
compostion. Using a layer for the armour and another for the pipes
and chains I started building up from the chest plate in the
following order:
|
The order of
things.....
Chest plate torso torso shoulder pads shoulder pads helmet helmet biceps biceps forarms forarms hips hips thighs thighs calves calves feet feet hands hands staff staff flail flail chest pipes chest pipes hips chains hips chains pouch pouch rear guns rear guns sword and scabbard sword and scabbard orc head orc head assorted floor
rubbish assorted floor
rubbish |
| 7. INTO THE LIGHT |
|
Here the choice is as
wide and varied as you care to make it. I tried several different
permutations until I settled with the final
one:
 1x Sun (Default light), white, from top left, shadows
on, ZMode, set to 1.0 1x Sun (Default light), white, from top left, shadows
on, ZMode, set to 1.0 |
 1x Sun (Default light), white, from top left, shadows
on, ZMode,0.4 1x Sun (Default light), white, from top left, shadows
on, ZMode,0.4 |
 1x Sun (added), blue, from bottom right,
ZMode,1.0 1x Sun (added), blue, from bottom right,
ZMode,1.0 |
 1x Glow, aqua, placed on the flail spikes to the
right, shadows off. 0.7 1x Glow, aqua, placed on the flail spikes to the
right, shadows off. 0.7 |
 1x Glow, pale orange, placed on the Orc head to the
left, shadows off, 0.3 1x Glow, pale orange, placed on the Orc head to the
left, shadows off, 0.3
|
|